The source code can be imported using the command line version of CVS, WinCVS or TortoiseCVS.
To import the source code into a CVS repository use the import command. If you are setting up a local repository (single user) and it has not been initialised then that must be done before the import. NOTE: setting up the CVS configuration files (such as cvswrappers) must be done after the repository is initialised.
This example shows setting the CVSROOT environment variable for a local (single user) repository and initialising it. NOTE: Ensure none of the files are being used before begining the import.
set CVSROOT=:local:c:\cvsrep\cvs
cvs -d :local:c:\cvsrep\cvs init
cvs -d :local:c:\cvsrep\cvs co CVSROOT
notepad CVSROOT\cvswrappers
cd CVSROOT
cvs commit -m "Add specifiers for Uniface"
cd ..\
cvs -d :local:c:\cvsrep\cvs release -d CVSROOT
Are you sure you want to release (and delete) directory `CVSROOT': y

cvs import -m "Initial import" . Trunk unifaceapp_1_0
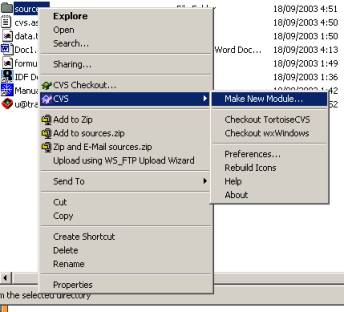
To import the source code into a CVS repository right click on the directory name "cvstest" (the parent of "sources") in Windows Explorer and select CVS->Make New Module...
You are then requested to enter the CVSROOT and login details to add the module. Select the "Check out files read-only" option.

When the import completes press OK on the log file window.

To import the "sources" right click the same directory name in windows explorer and select "CVS add contents...". Ensure that the file format of the files is correct. XML, CSS, and XSL files are all ASCII. FRM, SVC and other "compiled" files are "Binary".
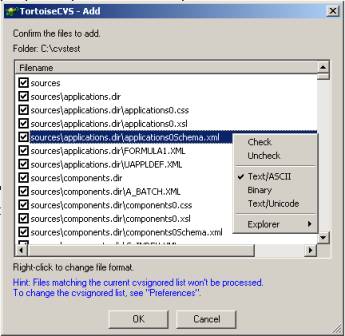
Press OK when the file types are correct. Press OK on the results window when Tortoise CVS has completed processing.
To finalise the import right click the same directory name in windows explorer and select "CVS commit...".
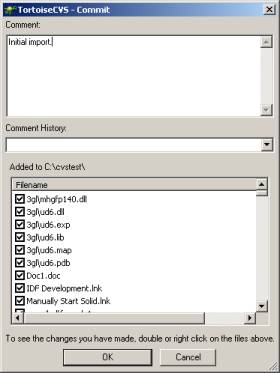
Enter a comment and press OK to complete the import. Press OK when the commit has complete to close the log window.
If you are setting up a local repository (single user) and it has not been initialised then that must be done before the import. NOTE: setting up the CVS configuration files (such as cvswrappers) must be done after the repository is initialised.
To initialise a new repository, choose "Create->Create a new repository..." from the WinCVS pulldown menu and select the "General" Tab. Set the CVSROOT and the Authentication
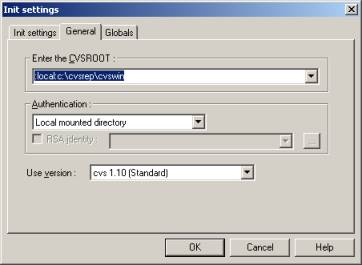
Select the "Globals" Tab and ensure that "Check out read-only" is ticked.

Press OK to initialise a new repository.
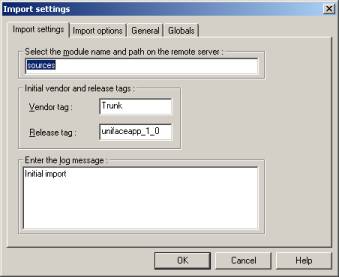
Change the location to your directory tree using the "change location" button. To import the source code, choose "Create->Import module..." from the WinCVS pulldown menu and select the directory to import. Press OK to begin the import.
You may be prompted because the XML files have some escape characters in them. This is normal for XML files when NLS is used.
The dialog box also lists the types of each file imported. By double clicking on a type you can change it. XML, XSL and CSS files should be set to "Force no keywords expansion (-ko)" unless you are sure that no CVS keywords are used in your Uniface source code. FRM, SVC and other "compiled" objects should be set to "Force binary (-kb)".
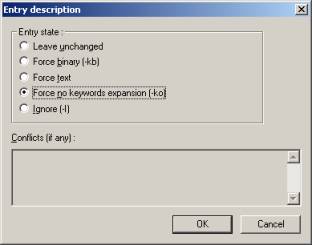
Press Continue to complete the import.

Enter module name, vendor tag, release tag and a comment then press OK to execute the import.
Quit WinCVS and delete the directories that you imported using windows explorer.
Creating a Work Area Keeping the Work Area up to date Final Directory StructuresA methodology to Uniface source code control
How to get and install CVS
Introduction and Configuration
Taking control
Releasing a form
Checking a form in
Releasing a form and application model
Releasing registers
Adding a form
Differences
Merging code changes
Final notes
| $Revision: 1.4.2.3 $ $Date: 2003/09/16 18:32:14 $ | [go to top] |